So I got a strat kit for Christmas. At the same time, I decided to buy a Squier CV 60s strat, so that's my vintagey strat taken care of.
This means I get to do something more interesting with the kit. I'm going to go for a slightly seventies vibe on it (but with things I like changed). So, for the body I'm going to stain it mahogany and the tru-oil it hopefully to the point that it has a lacquer like finish, which should involve lots and lots of sanding, but if I fuck it up I will still have a nicish satin finish, I'm hoping. Neck will be oiled and also hopefully similarly lacquerey. Headstock is 50s style because I far, far prefer the shape.
For electronics I'm hoping to eventually end up with a Lace Sensor set (red, silver and blue) which I'm going to wait and try to grab cheap on ebay. Black scratchplate. I might then play with the electronics and see if there's anything else I want to do with it.
Eventually I might upgrade the bridge to a Wilkinson.
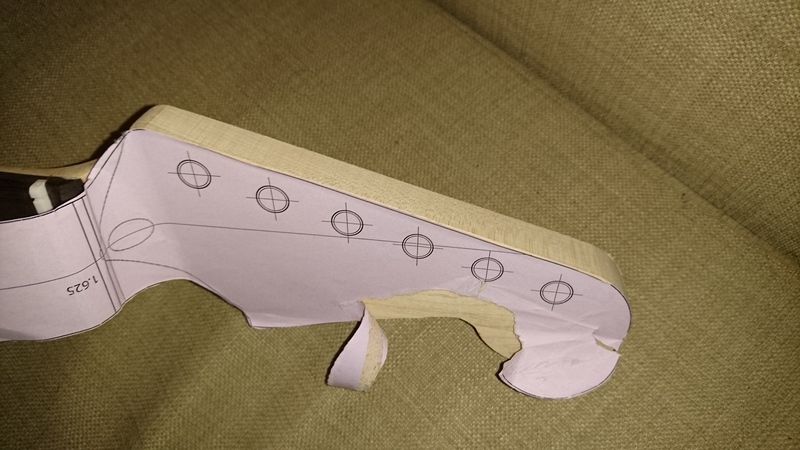
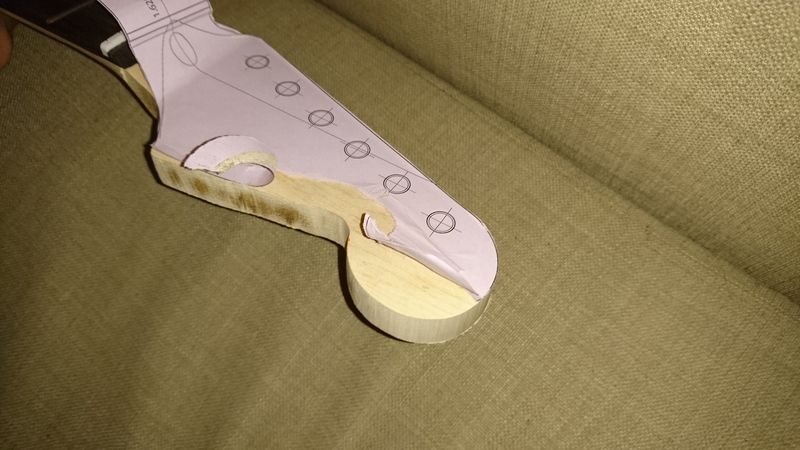
Today though, I took the neck into school and started on the headstock using a hegner saw and a bandfacer. Still a few burn marks and odd bits, but nothing some sandpaper and a bit of filing won't fix. Quite pleased, although there is a bit to be done on the treble side past the nut to make the back of the headstock match up with the new shape.
Posted: Thu Jan 12, 2017 1:44 am
by paul_
Noice. I loved the Lace Red I got for bridge-position bucker-alike crunch or fuzzy goodness, wasn't that keen on the cleans... but the silver and blue do sound quite nice clean.
I would go with a 2-point bridge from the get-go if you're going to slap a Wilkinson on there, maybe check Wilky's 2-point spacing and find something cheap and cheerful to hold the place in the meantime.
I dread the day I have to cut out a headstock shape. I've done the little notch to make a kit Gibson the proper bookscroll shape, but that's it.
Strat projects are so common they always start with unadulterated optimism, never gets old. I love slapping a Strat together almost as much as I like it not quite working out and getting to take it apart and try another one.
Posted: Thu Jan 12, 2017 6:13 pm
by Bacchus
I have the benefit of the Technology and Design department of the school I teach at to take over if I'm going to mess anything up. Otherwise I might not have had the bravery to try to get this shape (it's always easy to spot a just off strat headstock).
I thought one of Wilkinsons things was that they had widened holes so spacing wasn't such a big issue? One, normal circular hole to locate the thing then the others have a bit of lee-way?
Posted: Sun Jan 15, 2017 2:16 pm
by Bacchus
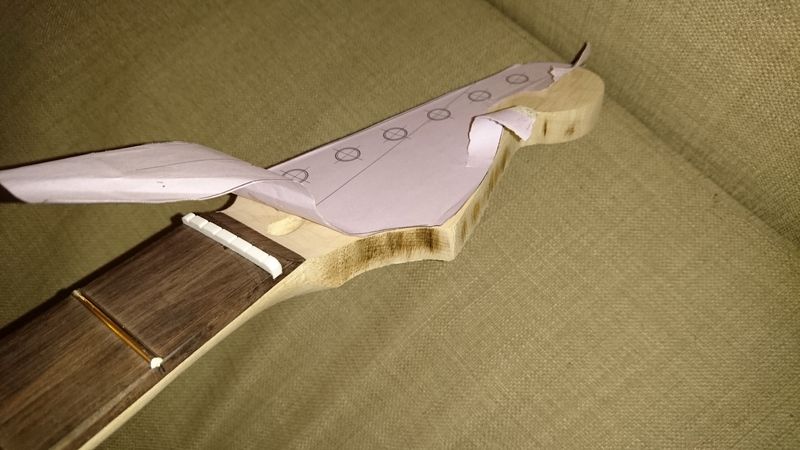
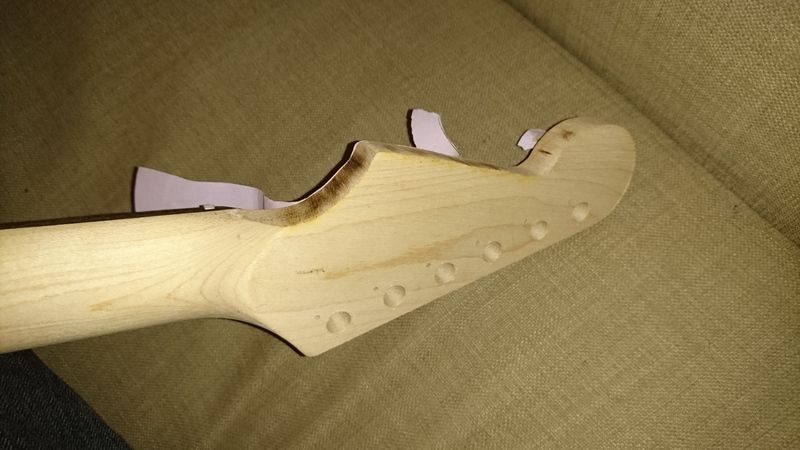
Tidied up a bit. Still the odd slight burn mark, but I'm happy enough with it to not risk messing the shape up. Now I need to wait until payday to order some stain and tru-oil.
Posted: Mon Jan 16, 2017 12:59 pm
by NickS
Looks like a good start
Posted: Mon Jan 16, 2017 1:59 pm
by Doog
Love the thread title and project.
Right up until you made the headstock smaller??
Posted: Sun Jan 29, 2017 1:26 pm
by Bacchus
Prep done: Sanded to 600, raised the grain and sanded back again:
First coat of stain, might go a second before starting to sand and grain fill with oil:
And first coat of oil on the neck:
Posted: Sun Jan 29, 2017 2:25 pm
by robert(original)
it may just be the angle but those frets look HUGE! im digging the stained body look.
Posted: Sun Jan 29, 2017 3:07 pm
by cooter
That stain looks really nice.
Posted: Sun Jan 29, 2017 3:27 pm
by Bacchus
robert(original) wrote:it may just be the angle but those frets look HUGE! im digging the stained body look.
Yeah, I think that is the angle and the fact that phone camera lenses are kinda wide so can do weird things with perspective. When I had it strung up to make sure everything fitted, they felt like normal jumbo frets.
Posted: Sun Jan 29, 2017 7:26 pm
by Bacchus
The neck has darkened a bit during the day, I like it:
And the back:
Posted: Sun Jan 29, 2017 9:54 pm
by Grant
Really like that stain. Beautiful!
Posted: Mon Jan 30, 2017 12:58 am
by robert(original)
i concur, the stain on that body turned out looking way cooler than i would have imagined, im not much on stained bodies, but that thing is pretty rockin.
Posted: Mon Jan 30, 2017 6:37 pm
by Bacchus
Coat two on the top. Still deciding if I'm going to put a third on.
Posted: Mon Jan 30, 2017 10:06 pm
by robert(original)
i would keep it as is. i think it looks ace, any darker and you might lose some of that great contrast.
Posted: Mon Jan 30, 2017 10:35 pm
by Bacchus
My concern now is that I've used an oil based stain, and I'm finishing with Tru-Oil, which might lift some of the finish back out of the wood?
Posted: Tue Jan 31, 2017 7:58 pm
by robert(original)
i don't have enough experience with oils and rubbed finishes. im sure there is some sort of tutorial thing. it may even be worthwhile to look at how gun stocks are done with oil since its the same process and i know that is a big thing, around here anyway.
So far I've only been oiling the neck (want to make really sure the body is dry before oiling it) and I can see it starting to build. Lots of wet sanding, though.
Posted: Thu Feb 02, 2017 10:28 pm
by Bacchus
Nearly out of Tru-Oil, I might be doing something wrong because I'm getting through it.
Oiled and grain-filled the front. Lifted the colour a little bit I think, but it's fine.
The neck is starting to look really glossy.
Posted: Fri Feb 10, 2017 4:07 pm
by Bacchus
Pickguard arrived whilst I'm waiting for more oil to get here.